How to Squat: A Mobster's Story

Brooklyn, 1976.
On a rainy November evening, mobster Joey Tortellini and his goons are at Duke’s, a family Italian bistro, for their monthly meeting. Duke's is known for two things: mobster meetings, and chili con carne. Their signature dish remains unchanged for over three decades. Served with a side of crackers, the chili itself is a rather ordinary blend of cumin, cayenne pepper, chili powder, and garlic. But its association with the mob has elevated the dish to mythical levels. The chili runs darker than most other chilis. Legend has it, the chili's unique mahogany tinge is a product of secret ingredients delivered by the mob—some say human remains, others say Italian espresso beans.
Tortellini is notorious in the area for drug dealing, extortion, and kidnapping. Regular mob stuff. Early in his career, he felt pressure to stand out. While his colleagues were busting knee caps, chopping fingers, and waterboarding, Tortellini was uninspired by traditional methods of torture. It was while breaking someone’s legs for a delinquent debt that an idea struck him: Heavy barbell squats at gunpoint. It was this idea that earned him the nickname, Quad Reaper.
This particular evening is the first day as a waiter for local college student Bradley, and Tortellini is at his table. Bradley is a junior at Utica college, majoring in applied physics. A job at Duke's is coveted by many college students because mobsters are known to tip well. On the other hand, if you mess up their order, they’ll kill you.

As usual, Tortellini and his goons order a round of chilis. That’s seven large bowls. Bradley has never even held a tray before, let alone be face to face with the most notorious mobster in New York.
To carry a tray of chili, what should you consider? Let’s go back to the three laws of force:
1. You have to pick the tray up.
2. To carry the tray, you have to counter the downward force of the tray with the upward force of your hand.
3. Balance the tray evenly against gravity by holding it in the center.
As you can see, lifting weights and lifting a tray of chili are both governed by the same laws of nature. Bradly learns this the hard way when he spills the entire tray of chili on Tortellini’s crew.

Tortellini stands up, his white Adidas tracksuit smeared with chili. He dabs the stain using a cloth napkin with the quiet intensity of a pot of boiling water.
His goons blindfold Bradley, stuff in him in a van, and drive 45 minutes to an empty warehouse. In the center of the warehouse, under a single bulb of light is a squat rack. The crew points their guns at him and orders him to squat. Bradley immediately recognizes that holding a barbell on his back is like holding a tray in his hand. Failure to understand this concept is what led him to this situation. Learning from his mistakes, he prepares to squat for his life.
Let’s go over how to do that.
The Muscles You Use in a Squat
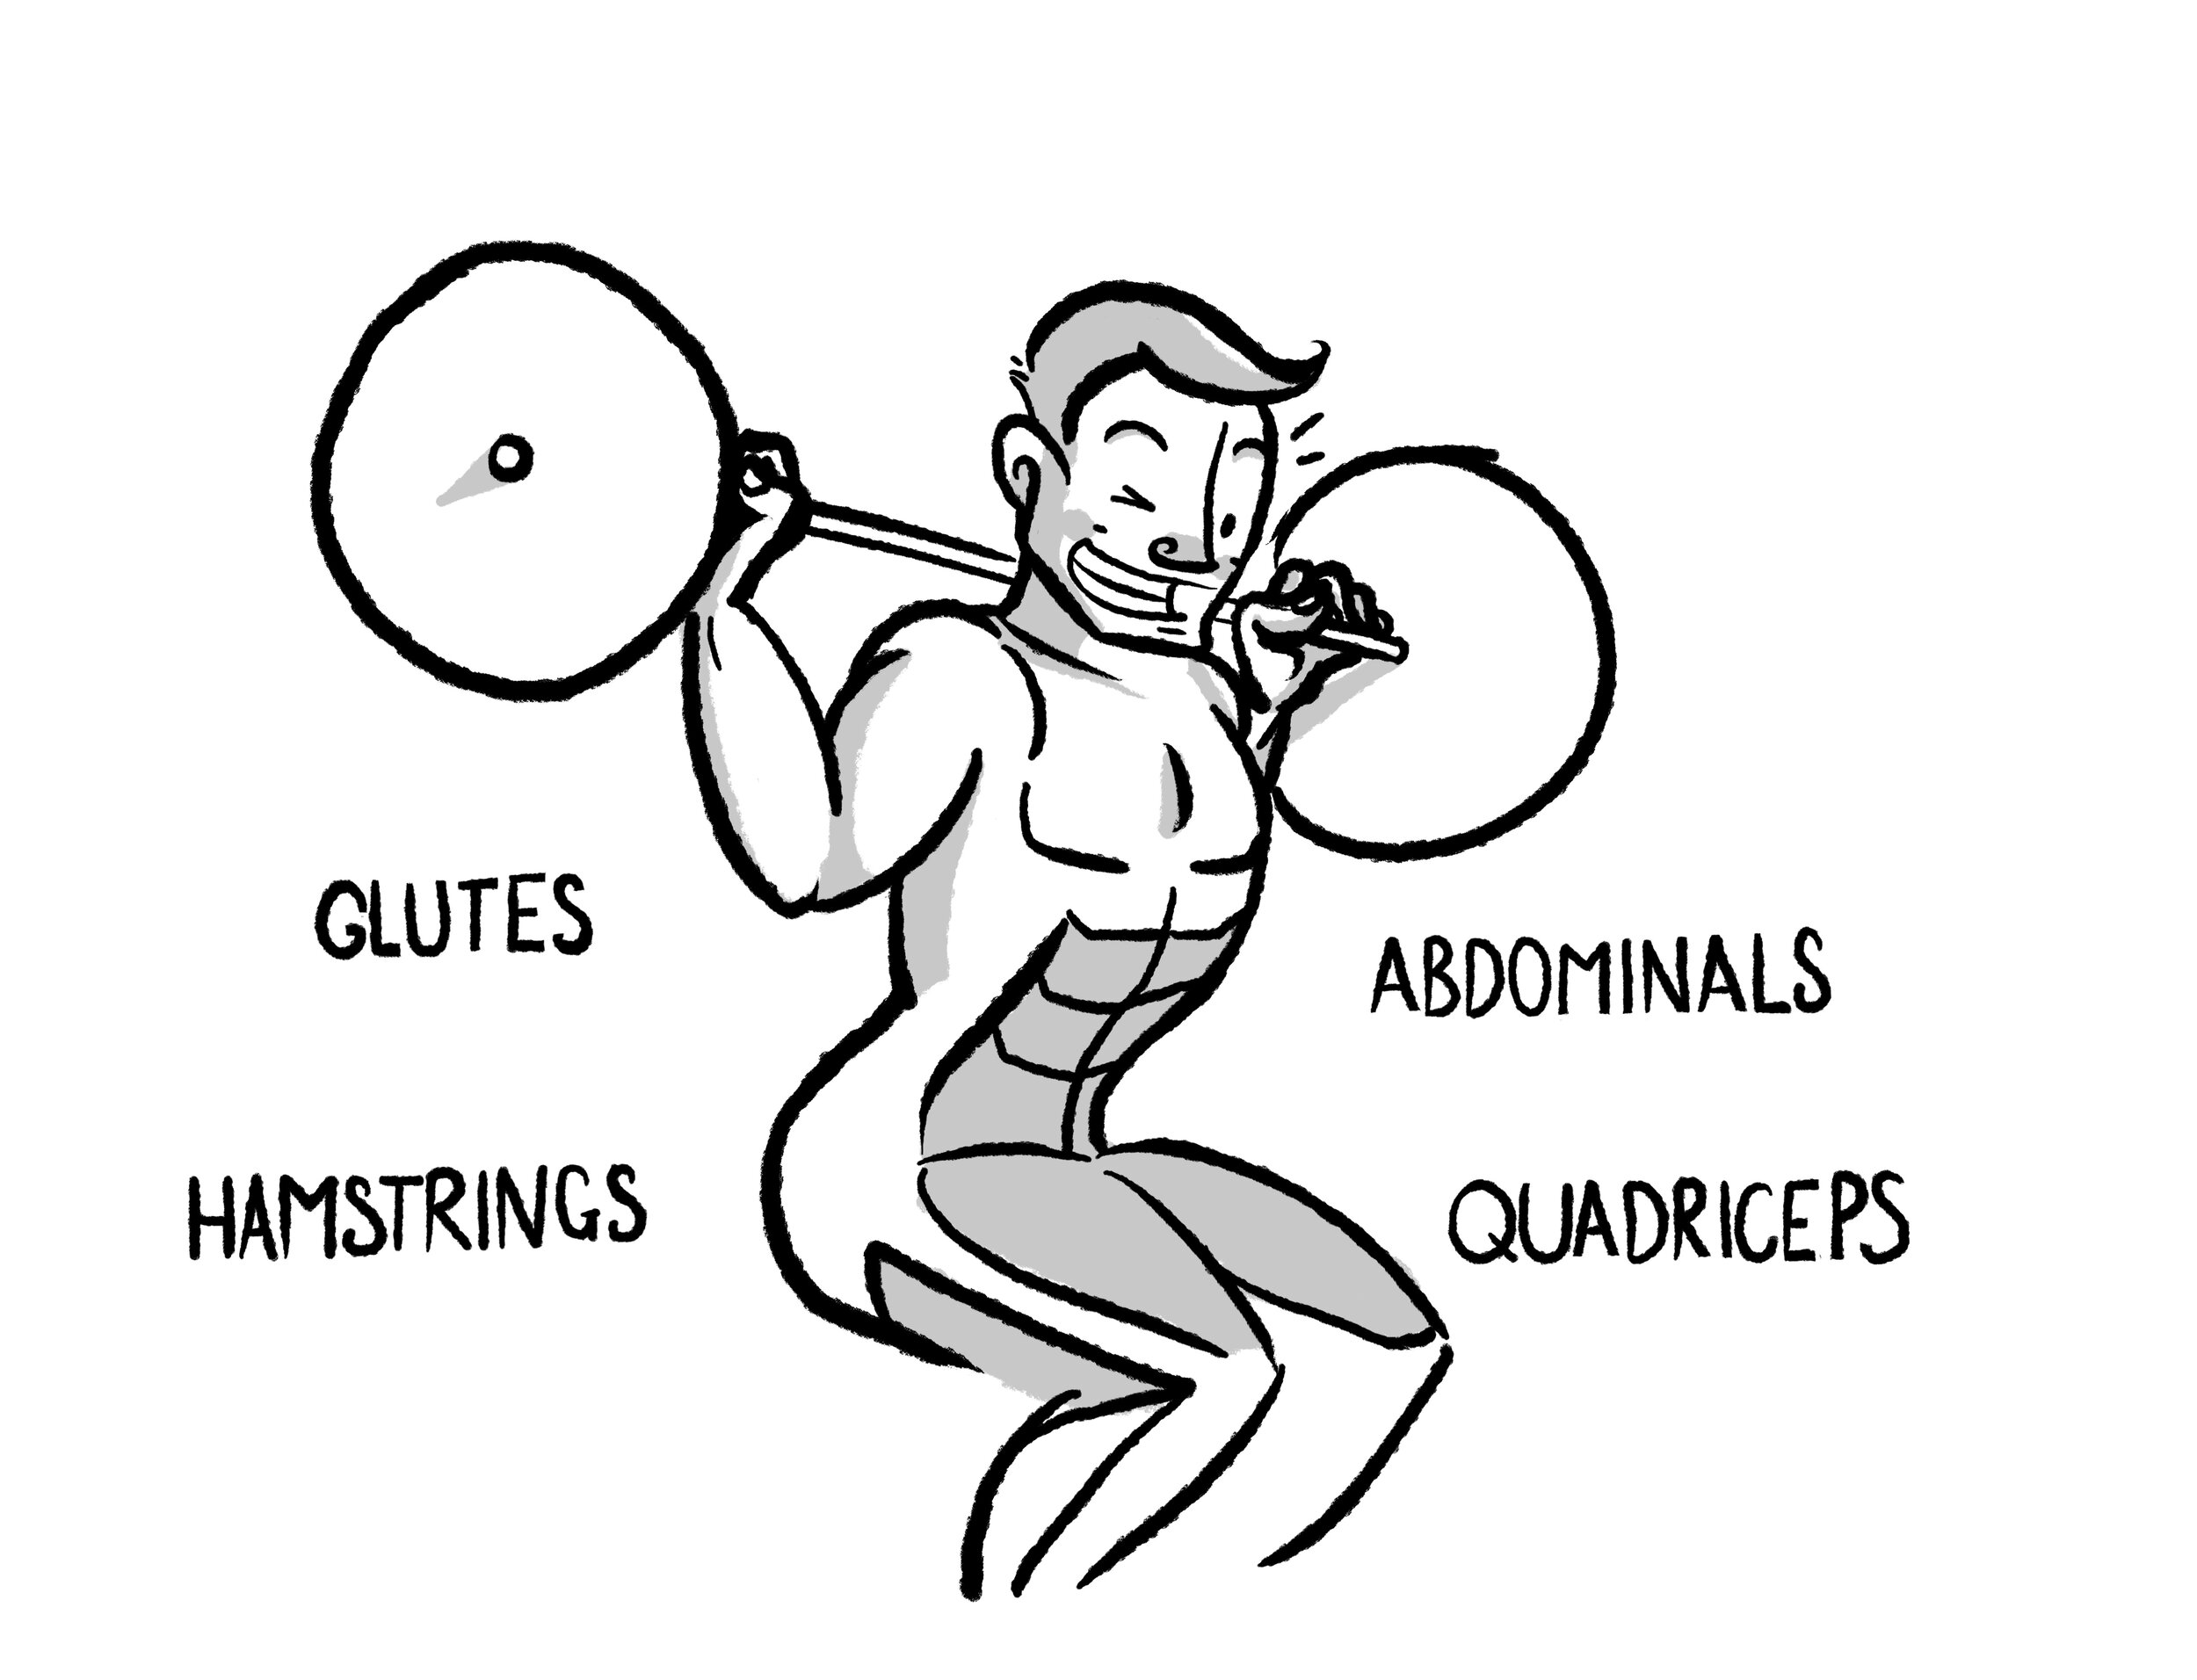
Quads: The four muscles of the quadriceps are responsible for extending the knee. The rectus femoris helps the hip bend.
Hamstrings: The four muscles of the hamstrings are responsible for bending the knee back and extending the hip.
Glutes: The gluteus maximus (comprised of gluteus medius and minimus) is one of the most powerful muscles in the body. The glutes are responsible for extending your hips.
Core: The “core” is made of the pelvic floor muscles, transverse abdominis, multifidus, obliques, rectus abdominis, and erector spinae. Your ability to make them work in synchronicity results in core stability.
Moments in the Squat
Gravity pulls the barbell down in a straight line, and your job is to overcome gravity. To achieve this, align the barbell with the center of your foot and push with your entire foot. Creating a moment arm between the bar and midfoot is a lot of unnecessary work. The squat becomes unbalanced if the barbell is not in line with midfoot since force is no longer applied to the bar vertically.

When you bend your hips to squat, your hip and the barbell become the moment arm. Think of squatting as turning a bolt with a wrench. Your hips are where the wrench fits the bolt, and your barbell is where your hand pushes the wrench up and down.
Read more about this on our Meathead Physics article.
How to Squat for Real
With seven Tommy guns pointed at him, and 200lb on his back, Bradley is ordered to squat. Bradley takes in a big gulp of air and braces his core. He squeezes his lats to stabilize his spine. He creates tension in his hips and initiates the squat by hinging with his hips. He sinks to the bottom and flies back up. He does this 10 times with ease.
Tortellini is shocked and, needless to say, embarrassed. Bradley is released, not before his quad pump dissipates, and Tortellini’s leadership ability is now in question.
For Tortellini, death-by-squats has never failed. To him, squats are the hardest thing in the world; there’s no way someone can do 10 barbell squats. To see Bradley do them with such ease shakes him to his core. He decides to hire a personal trainer to become the best squatter in the mob.

Squat Basics
Before loading up a barbell and thwarting death, it will benefit you to take the time to learn what a good squat looks and feels like to you. There is no right or wrong way to squat; everyone squats a little differently. Regardless of the way you do it, each squat needs to have a few things in common:
Foot stability
Knee and toe alignment
Hip hinge
Hip torque
Core stability/full body tension
Hip drive
An easy way to remember these is with the handy mnemonic, Farting Koalas Help Henry Craft Houses.

Feet Stable: Once you have your foot position set, establish three contact points on your foot: Big toe, pinky toe, and heel. Digging your big toe into the ground often does the trick by flexing the arch in your foot. If your feet move around during your squat, you have an unstable base from which to push the weight. You may have heard people say, “Push from your heels.” Well, don’t listen to them. You need to use your whole foot.

Toes and knee alignment: Regardless of your stance, keep your toes and knees in alignment. This will keep your knees and hips stable. Most people feel comfortable with their toes angled out slightly.

Hip torque: Torque is rotational force. By creating torque at the hips, you'll improve your hip drive, knee alignment, and glute engagement—all good things to have. The most common cues that help with this are:

Spread the floor: pretend your splitting the ground beneath you with your feet.

Screw your feet into the floor: rotate your foot outward while pressing into the ground. (You shouldn’t actually rotate it, but enough to create some torque in your hips).

Push your knees out: as you ascent, shove your knees out. Make sure they are in line with your feet and they maintain full contact on the ground.
Hip hinge: The squat and deadlift teach you how to use your hips to move heavy weights. Every squat begins with a hip hinge—driving the hips back and your chest forward—to engage the posterior chain. Some cues that help:
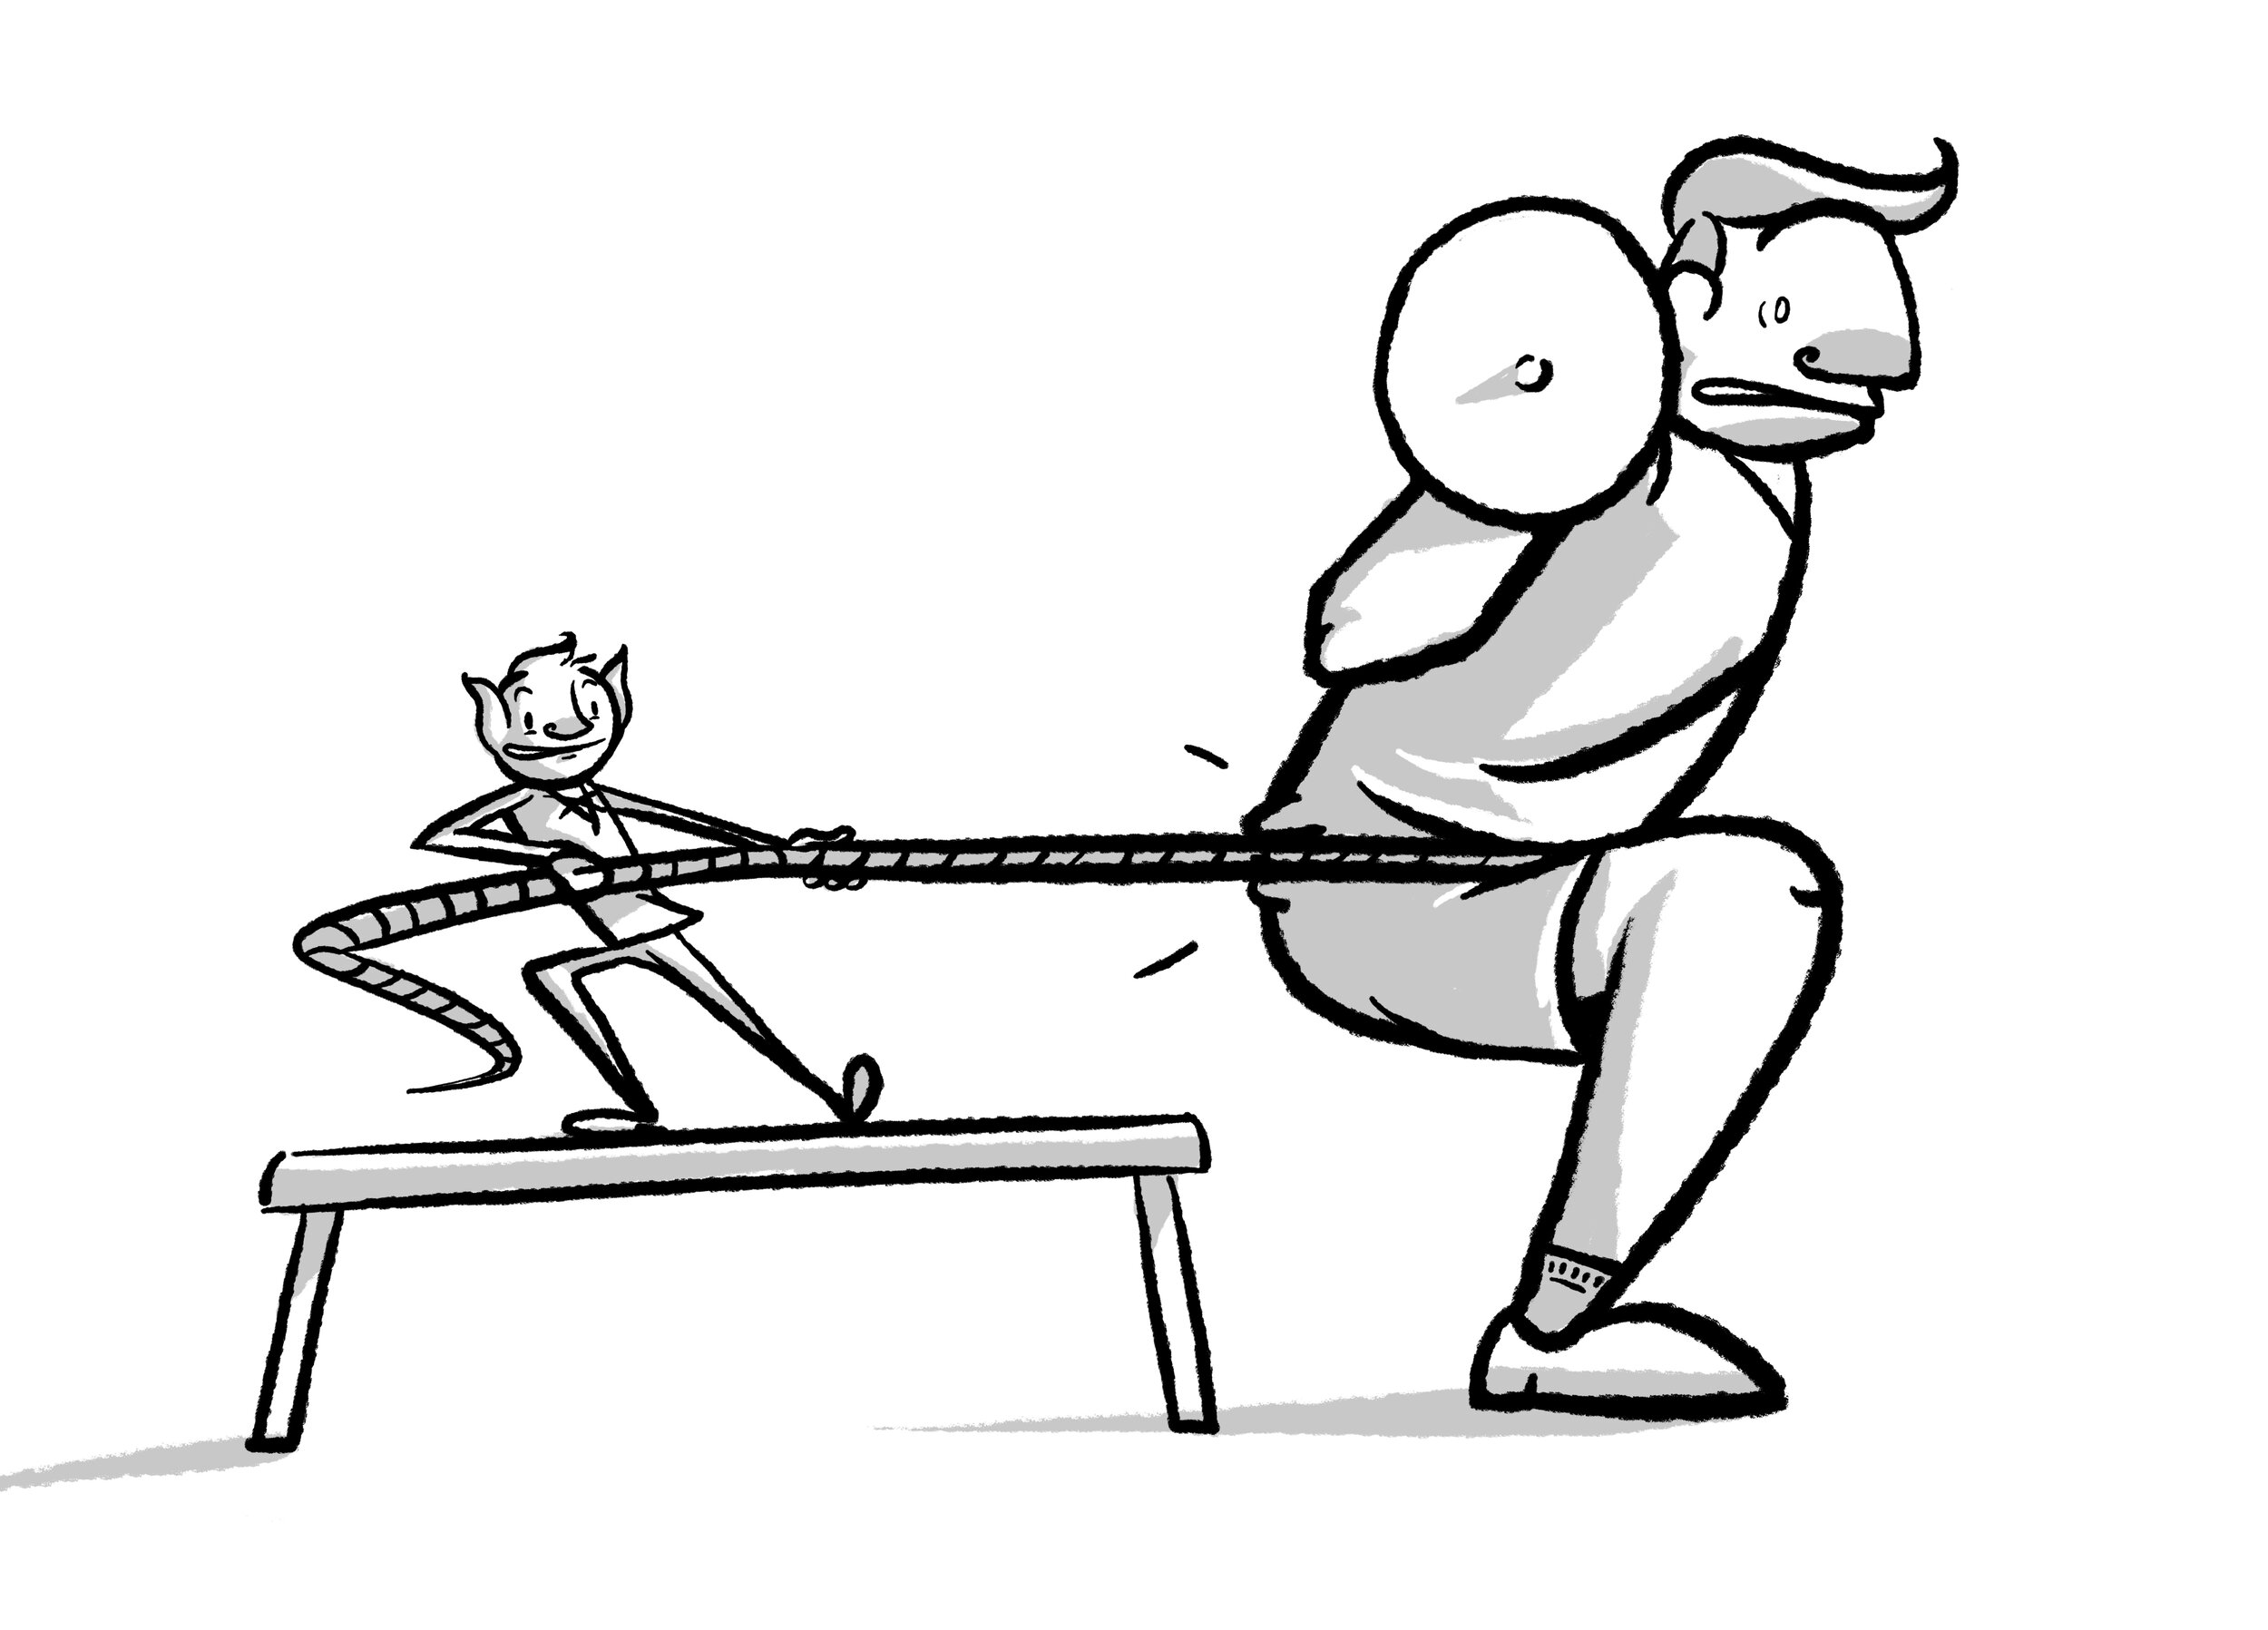
Stick your butt out, as if a goblin was pulling them back with a rope.
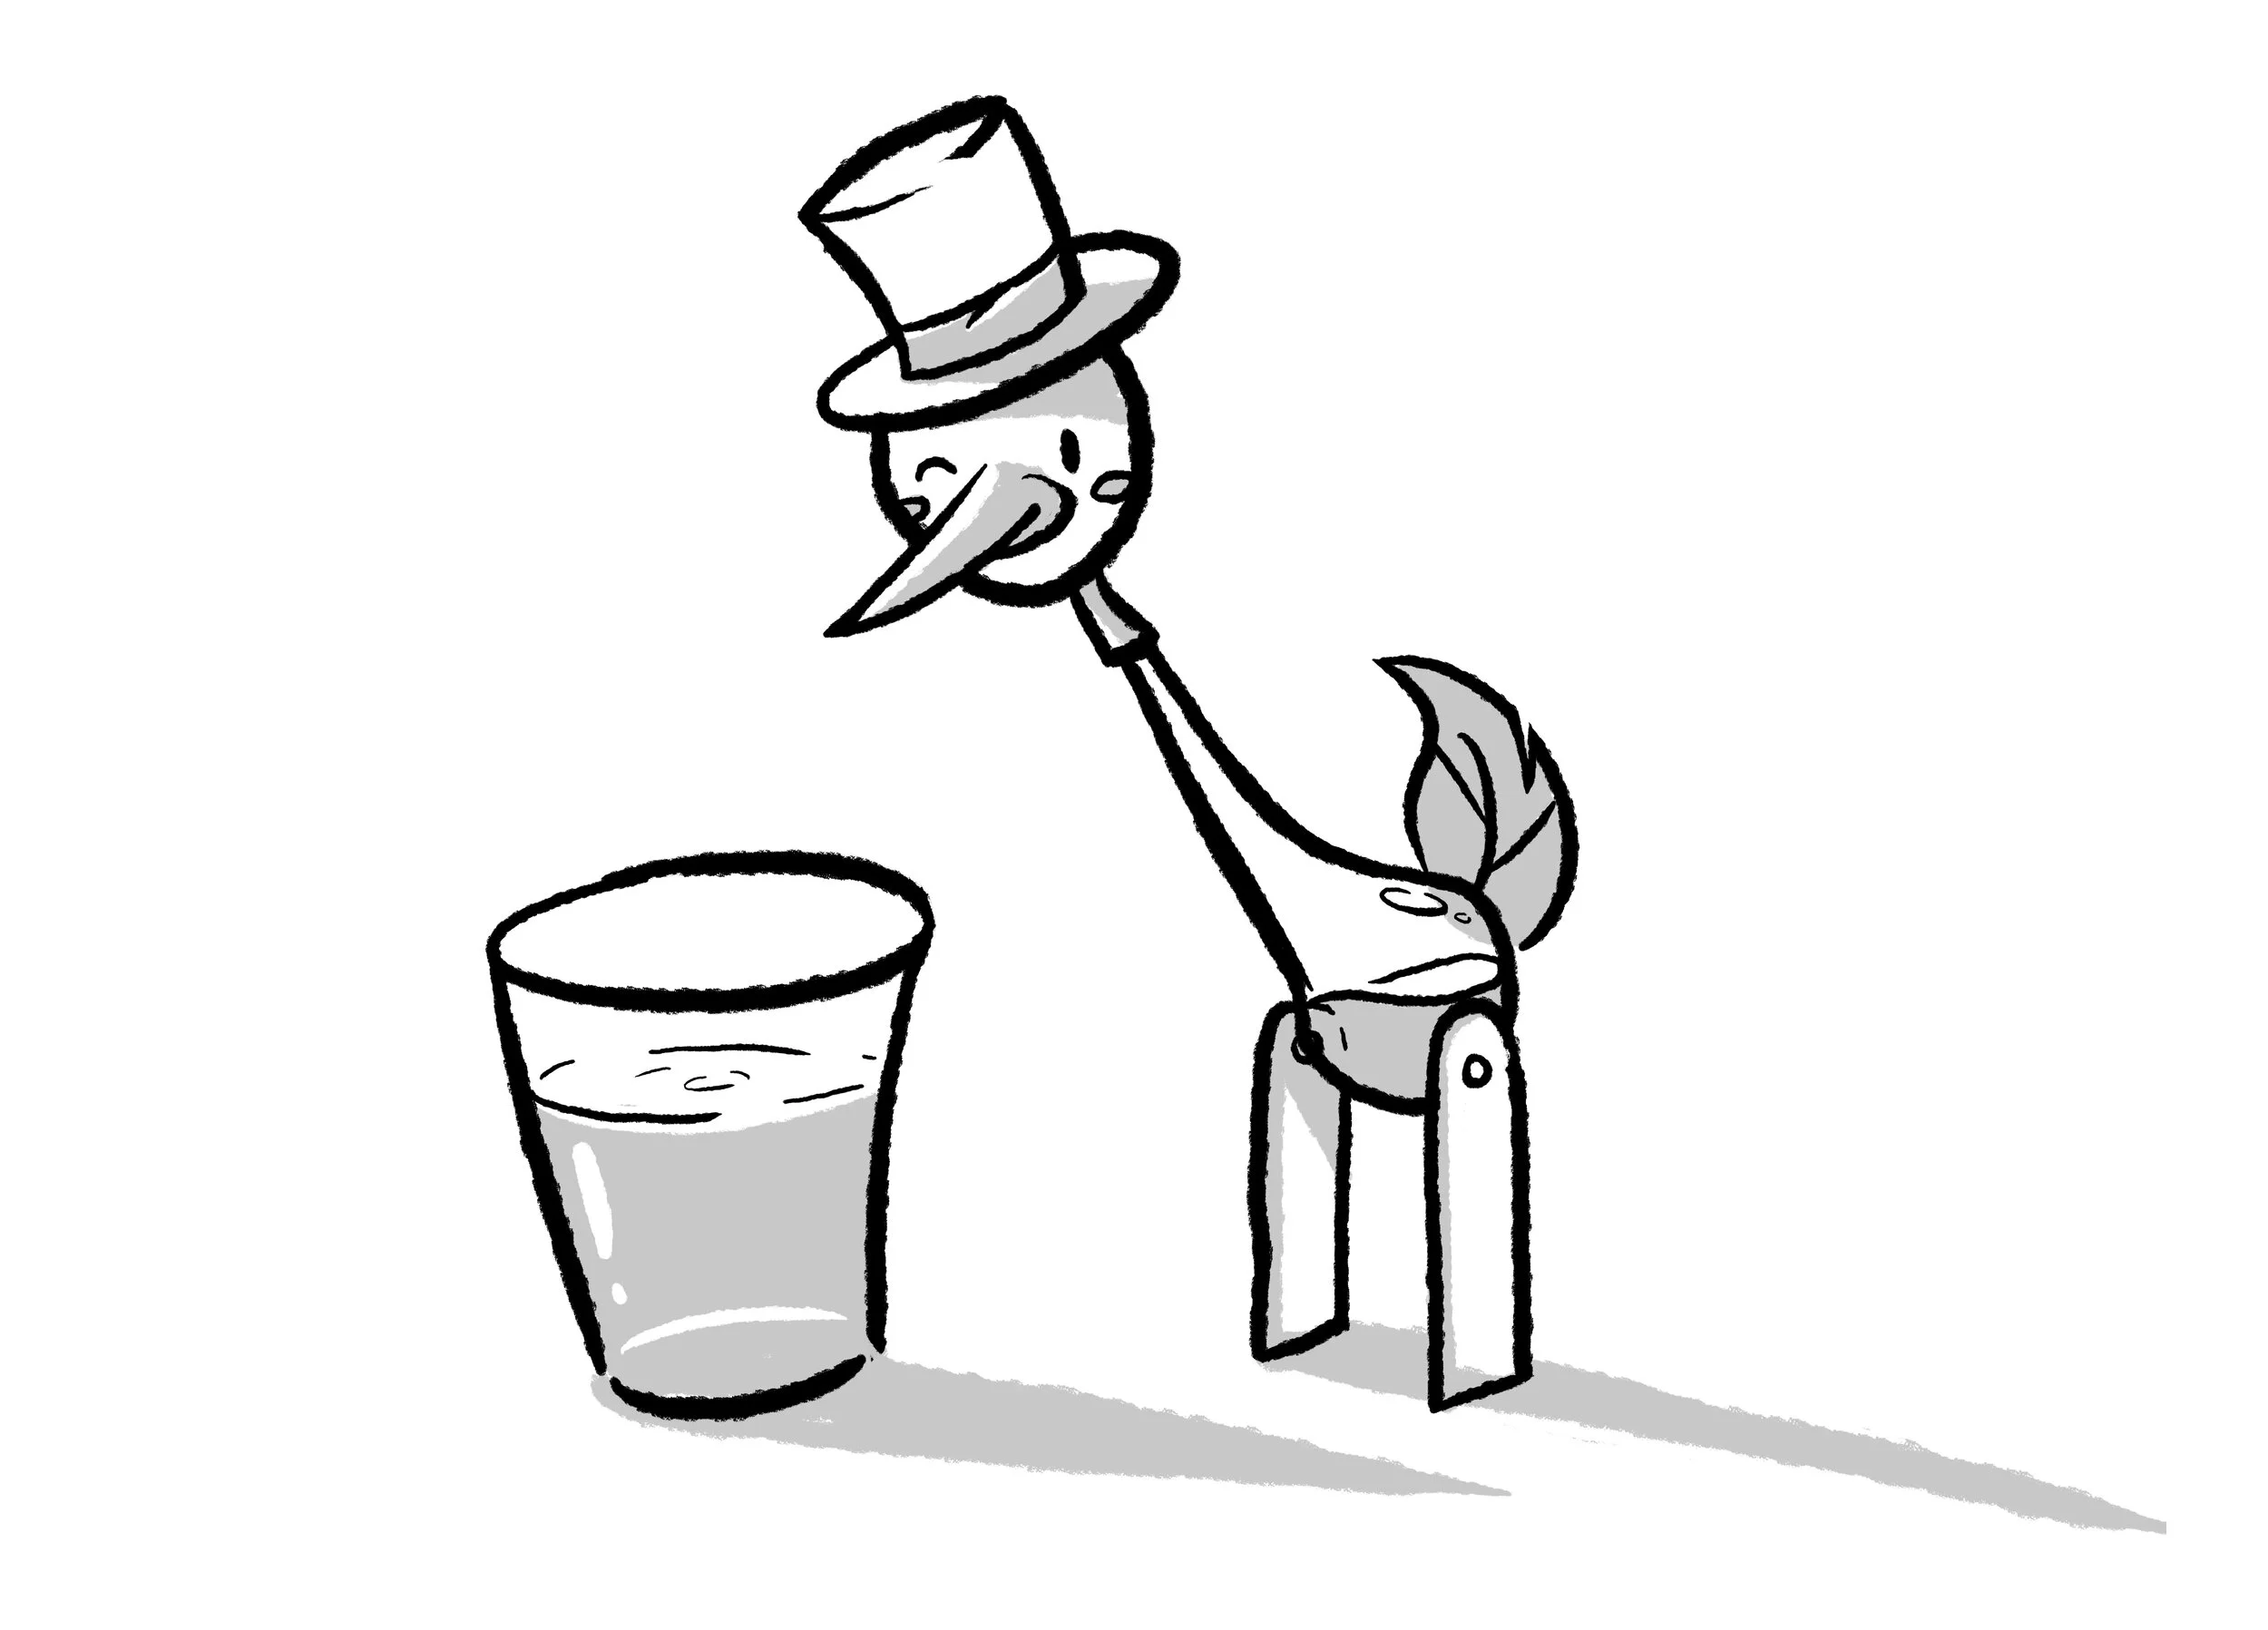
Imagine you’re a drinking bird.
Core stability/full-body tension: Postural integrity in the squat is important—people worry about knee injuries in the squat, but back injuries are far more common. Make sure you're bracing, have your feet stable, your hips torqued, and squeeze your lats.
Hip drive: Your hips are the biggest movers in your squat, providing power out of the bottom and through any sticking points.
Progressions
Step 1: The body weight squat

I recommend doing these barefooted to get a sense of any instability there may be in your foot. Planted feet comprise the first step to squatting well.
Extend your arms in front of you; this will help you maintain an upright trunk. Aim to keep your arms parallel to the ground.
To descend, there are two ways to hip hinge:
Break with your hips first: Keep your shins straight as long as possible as you descend. Your hips go back and your chest comes forward.
Break with your hip and knees at the same time: your chest and hips should descend together.
Breaking at the knees too early will shift your weight too far forward and you’ll end up off-balance.
At the bottom of the squat, your weight should be evenly distributed on the three contact points of your foot.
The primary driver on the ascent is your hips. Make sure your chest and hips rise together, and your knees stay in alignment with your toes.

Step 2: Goblet squat

After you’ve mastered the body weight squat, grab your favorite goblet/kettlebell/dumbbell. Holding a weight in front of you acts as a counterweight, and helps you maintain balance.
Hold a a weight at chest level, balancing the weight against the heel of your hand. Keep your elbows in tight against your body, get braced, and squat.
Step 3: Barbell back squat

Bar placement

Start with the bar at chest height. If you squeeze your shoulder blades together, you’ll create a “meat shelf” for the barbell. These are your traps. The bar should rest on your traps/meat shelf without pain. Placing the bar right under the C7 spinous process (that bone that juts out of your neck when you look down) works well. If you feel you need to use a pad to reduce pain from the bar, you’re placing the bar in the wrong spot or you’re not creating a meaty enough shelf.
For the low bar squat, rest the bar on the rear delts; they are less meaty and less “shelfy.” They’re more like meat trays.
Which is better: low bar or high bar?
I’m not going to debate minutia here because it doesn’t matter that much. The best squat form is the one in which you feel most comfortable and strongest. The low bar squat is the most popular in powerlifting because, in general, it shifts the leverage to the hips, resulting in less knee travel, and thus a shorter range of motion.
Grip: Your grip on the bar is down to your preference, but for most people, a narrower grip helps keep their upper-back meat shelf in place. However, your grip doesn't directly influence your scapular positioning (meat “shelfyness”). If you have some shoulder mobility issues, a wide grip works fine, too.

Wrists: A straight wrist position is ideal but not necessary. Mobility may be a limiting factor. In this case, simply widening your grip is an easy fix. Another solution is to place your thumb over the bar so the heel of your hand rests over the bar. If you prefer to squat with a bent wrist and it causes some discomfort, wrist wraps will help.
Elbows: In general, keeping your elbows aligned with your torso and close to your body will help to create and maintain tension in your lats and torso. In a low bar squat, driving the elbows up helps some people to create more stability by engaging their rear delts/meat trays more. This may cause your chest to dip forward, so watch out for that.
Unrack and Walkout
The part of the lift that is neglected most often is the unrack and walkout. A good starting position can make or break your lift. The unrack and walkout should be a short and precise mini squat. As in a regular squat, you should brace and lift with intention. Next, walk it out. There are two ways to do it: Two step and three step.
Two step: Better for narrow-stance squatters. Two steps back, and adjust your foot angle.
Three step: Better for wider-stance squatters. Two steps back, and one step to adjust your stance width.
Stance: Stand in the most comfortable way. Start with your feet at shoulder width. Experiment and you’ll figure it out. Your body will tell you how to squat.
Descent
After establishing three points of contact with your feet, create torque in your hips. Then brace your core and drop into a squat by either breaking at the hips first or breaking at the knees and hips simultaneously. Keep your movement controlled, and maintain tension in your whole body. Don’t worry if it doesn’t feel perfect right away. Keep experimenting and practicing and you’ll discover any areas that need tweaking to make it feel better.
Bottom
Your weight remains over the middle of your foot through the entire squat. At the bottom, make sure you’ve maintained the three points of contact on your feet and that the weight feels balanced. You should have full-body tension and the crease of your hip should either be in line with your knee or below it.*
*Some people aren’t built to squat this deep, and that’s fine. If your mobility is limited, aim to go as deep as you’re comfortable with.
Ascent
Your chest and hips should rise at the same time and you should finish the lift by driving your hips up. Squeeze the bar and shove your elbows under it, or let them flare up if you’re low bar squatting. Maintain torque in your hips; make sure your knees track with your toes and your hips rise with your chest. Did you make a funny face? Probably. That’s part of a good squat too.
Sticking points:
For most of us, the most difficult position in the squat is just above parallel. Why? This is the position where were are at a mechanical disadvantage. In the quarter squat position (somewhere between the bottom and top of our squat), your knees and your hips are in a Bermuda Triangle of failed squats.
To work around this, focus on the following:
Speed out of the hole: The more momentum you have leading up to your sticking point, the easier it’ll be to overcome.
Drive your hips through to finish the lift: As you reach your sticking point, shove your hips forward to finish the lift.
Common Mistakes (and Simple Solutions)
Knees cave in: Not all knee cave is bad. But excessive knee cave to where it causes pain is bad. Some easy solutions:
Bring your stance in: Your knees caving in may just be your body saying “You’re squatting too wide, asshole!”
Squat with a light band around your knees: The band will cue your body to push out against the band. Try it for a bit and hopefully the movement will become automatic.
Not deep enough: Not everyone can squat deep. Aim to squat at least parallel. If you can go past parallel, even better. Take a video of yourself every now and then to make sure you’re hitting depth and to check on any glaring form errors.
Butt wink: This is a controversial topic, and there isn’t a conclusive answer to what causes butt wink. Butt wink among five people could have five differing causes. Butt wink is when your lower back and pelvis round at the bottom of your squat.
Option 1: Your hip anatomy is not made to squat deep. If your hip sockets are deep, as you descend into the squat, the femoral neck (thigh bone) will pull the pelvis down, and the lumbar spine (lower back) along with it. Test this by stretching your hamstrings and squatting again. If there are zero improvements, it’s not your hamstring’s fault. In plain English: It’s your bones’ fault.
Option 2: Tight muscles. Tight hamstrings, glutes, piriformis, adductors or hip flexors may cause butt wink. Stretch and test the squat to pinpoint the cause.
Is it ok to have my knees over my toes? Yes. While the knees are stressed more when they pass the toes, your muscles will adapt. If you have persisting knee issues, then it’s probably best to avoid knees traveling over toes.
Where do I look? Some people say you have to look up; some say look down; some say keep your spine neutral. I believe a neutral spine is most helpful and feels the most natural when creating hip drive out of the hole but looking up isn’t a deal breaker.
Gear
Belt: A belt will help you increase your intra-abdominal pressure and helps you to brace harder. This can be handy, so use one.
Knee wraps: A tight wrap will directly affect your performance (increasing your lift by up to 10%) and change your technique. If used too much, some may argue that it can lead to compromised knee stability. I recommend you only use knee wraps for competition or for your heaviest sessions.
Knee sleeves: Sleeves keep your knees warm, but they don’t increase your performance in any way. Some swear by them, but I don't notice much difference with or without them.
Wrist wraps: If you have wrist pain during squats, wrist wraps will help.
Shoes: Any shoe with a solid, non-compressible sole is good. Do you need lifting shoes with a raised heel? Depends on your mobility. A raised heel can help you squat deeper while staying more upright. Flat-soled shoes are popular in powerlifting since the low bar squat doesn’t need much ankle flexion.